Lets decorate our own see-through paper plate fish bowl art projects for kids! This project is great for kids between the age of 4 and 8, both in the classroom and at home. This art project is good for creativity and summer fun!

Fish bowl art Project from paper plate
This art project is a super fun indoor activity to keep kids busy during the hot summer months. Making this art project will encourage kids to be creative and think critically about how to make their decorations fit inside the fish bowl. Kids love this fun easy art project and it is really easy to set up!
Related: Learn how to draw your own fish for your fish bowls!
Making see-through paper plate fish bowl art projects will challenge kids to think carefully about how to place their decorations so that they are layered correctly when they look at their fish bowl art from the front. This is great for improving their problem solving skills while making a fun and memorable art project!
This article includes affiliated links.
Supplies you will need for this art project

Steps to create these see-through paper plate fish bowl art projects
1: Cut the plate

Using a paper plate, cut it in half, then cut out the center part of the plate. If you prefer, or if you don’t have clear plastic sheets you can leave the center in tact and color the center of the plate instead for this project.
2: glue or tape on the clear plastic sheet

Place glue on the inside edge of the plate and glue on the clear plastic sheet, or plastic wrap. If it is not sticking well you can also tape it down. Then you may need to cut off any extra bits.
3: Decorate the bowl

Now color the paper plate with markers to decorate the bowl. You can also decorate the plate with crayons, paint, and stickers!
4: Create some fish for the fish bowl.

On some paper draw and color some fish to add to the fish bowl. Then cut it out. You can do any kind of fish, seaweed, underwater castles, whatever you want to put in your fish bowl!
5: Add decorations, sand, and the fish to the bowl

Using any glue that will dry clear, glue on the decorations, the fish and anything else you want to the back side of the plastic film. To make sure everything faces the right way you may need to put the glue on the front of each decoration and place it upside-down. You can also use sand, glitter, or glitter glue at the bottom to make the fish bowl nice and cozy!
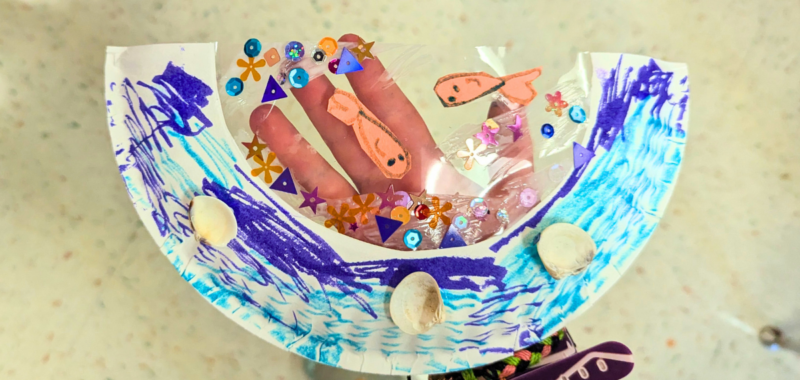
This is our See-through Paper Plate fish bowl art projects!


This is how our art projects turned out. The kids all thought it was super fun to make these too! It kept the kids busy for about half an hour and it was so fun making their own unique fish bowl art projects. Their favorite part about this art project was naming their fish and telling stories about their fish bowls!
Prep Time
5 minutes
Active Time
25 minutes
Total Time
30 minutes
Difficulty
Medium
Estimated Cost
$1
Materials
- – Plastic sheets, clear sandwich bags or plastic wrap.
- – Paper plates
- – Sequences, sand or sparkles.
- – Seashells (optional)
- – Colored paper
Tools
- – Markers
- – Liquid glue or glue sticks
- – Paintbrushes
- – Scissors
Instructions
- Cut the plate in half, then cut out the center.
- Glue or tape on plastic wrap or clear plastic sheets to the inside of the paper plate.
- Decorate the fish bowl by coloring the paper plate.
- Create fish, seaweed, underwater castles and more to put inside the fish bowl.
- Glue the decorations to the inside of the fish bowl by gluing the front of the decorations and placing it face down on the inside of the plastic film.
fishy art projects from kids activities blog
What did you put in your fish bowls! Let us know in the comments below!