Make an easy macrame plant hanger for the potted hanging plants on your porch. Follow this simple step by step tutorial to get you started with simple knots making this the perfect macrame plant hanger beginners project! Older kids and adults can use this macrame pattern and transform groups of cords into a lovely and simple macrame plant hanger.
How to Make a Macrame Plant Hanger
Making a macrame plant holder is the perfect way to spruce up those black and green potted hanging plants you have purchased. Don’t be intimidated. Making this macrame plant hanger is a really good first macrame project using basic macrame knots. And the beauty of macrame is that you can make it the perfect size for your plant and also your porch.
This article contains affiliate links.
Supplies Needed for Macrame Plant Hanger Project

How to measure your macrame plant holder
Before starting you need to work out how long you want your plant holder to be. As you can see from the photo below we purchased hanging ferns for our front porch. The hanger that came with them placed them way too high and they are brushing against the porch roof so I wanted them to hang lower to fill some of that open space.

The other thing you need to take into consideration is how big your plant is. A fern is quite bushy with a medium size plant pot, so keep the design simple, preferably in the hanging section, the lower part of the planter, and underneath it.
We went with a simple macramé basket for this reason. You can make them different sizes based on what we did below.
Instructions to Make Macrame Plant Holder
Step 1 – Cut Your Cords
Cut your cord according to these lengths if you plan on making your plant hanger the same length as ours.
- 6 pieces of cord x 8ft
- 2 pieces of cord x 4ft
Step 2

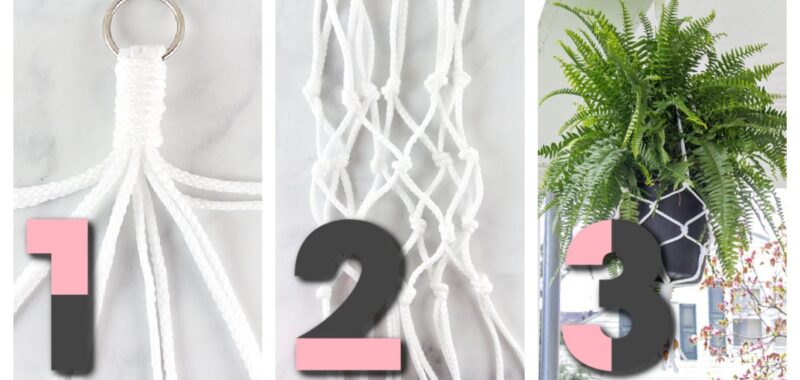
Fold your 6 cords over the ring so you now have 12 cords hanging down.
Step 3

Make a loop using one of the 4 ft piece of cord (as pictured above) on top of the 12 cords and begin winding it tightly around the top (pictured below). This can be wound any length you like, just make sure not to cover the entire loop.
If you have a different colored cord you could use that as well to make a block of colors on your planter.
Step 4

Put the end that is left through the loop. Grab hold of the cord that is sticking out the top and pull it. The loop and cord from the bottom will be pulled inside making it neat and tidy.
Cut off any excess hanging out.
Step 5

Separate all of your cords into groups of two to start working your macramé basket.
Step 6

Measure how low the top of the potted plant should be from the hook it’s currently on…

…the first basic knots that you make will sit at the top of the pot. Tie a square knot. All the knots that you will use in this easy craft are square knots – you can identify them by how the 2 cords come out on the same side both on top and bottom.
Step 7
Now you can start your net basket.

- Take the right cord from one group of cords and the left cord from the group next to it and tie them together in a knot about 3 inches down.
- Repeat until all groups are tied together.
- Now repeat this step and you will see a net shape forming.

Step 8
Repeat the first step of winding the 2nd 4ft cord around to secure all of the cords together.
If you like, you can attach beads to the cords left hanging. They are easier to string if you add a little tape to the end of the cord where it could be fraying and then string on the beads and tie your final knot!
Your Finished Macrame Planter

Carefully put your plant inside and move leaves between the cords so they aren’t bunched up. Hang it from a ceiling hook in a great place! I need more knot macrame plant hanger planters!
WhAt is Best cord For outdoor Macrame hanger?
When it comes to making a macramé plant hanger you need a cord strong enough to hold the weight of the plant and not fall apart, so a 4-6mm cord is perfect. You can use either cord or jute for this project.
If the planter is going to be hanging outdoors where rain and sun could affect it then you also need to take that into consideration. You don’t want a cord that will retain water and get moldy.
We used 6mm Bonnie Craft Cord which is great for outdoor use. It comes in a 100-yard roll so you can make a few plant holders that are perfect to give to friends as gifts. I have made two plant holders so far for our front porch and they look great.
Active Time
30 minutes
Total Time
30 minutes
Difficulty
Medium
Estimated Cost
$10
Materials
- 6mm cord cotton macrame rope – we used white (more info below)
- 2-inch ring – we used a silver metal one
- Beads (optional) – we used wooden macrame beads
Tools
- Scissors
- Tape measure
- Tape – we used clear tape
Instructions
- If you are making the same length macrame plant hanger we did, you will need to cut 6 pieces of cord 8 feet in length and 2 pieces of cord 4 feet in length.
- Fold the 6 longer cords over the metal ring.
- Using one of the 4 feet rope lengths, wrap around the cords under the ring and secure by looping underneath and then cut the excess length of that wrapping cord.
- Separate the cords into groups of two.
- Measure how far down you want your planter basket to be and then make your first knots between the two cords at the height you want the top of your pot to sit.
- Take the right cord from one group and the left cord from the adjacent group and tie a knot about 3 inches below.
- Repeat this pattern until you have a row of knots.
- Now repeat 3 inches below that…and so on.
- When you have made the macrame basket deep enough, use the other 4 foot cord to wrap around the bottom and secure all the ropes together.
- Add beads and trim the bottom.
- Hang on your porch!
More Easy Crafts & Simple Project Ideas to Try from Kids ACtivities Blog
How did your macrame plant hanger turn out? What colors of rope did you use?