School aged kids learn new techniques using every day supplies while painting with watercolors. We’ve included a printable to make charting this lesson even easier at home or in the classroom!

Exploring Supplies with Fun Watercolor Techniques
Kids learn best when exploring with hands on activities. This project gives kids a chance to see how every day supplies can be used in unique ways to create art. Kids will experiment with items such as salt, rubbing alcohol, saran wrap, and so on, to see how each interacts with watercolor. This project feels like a combination of art and science together. Plus, it encourages kids to think outside the box and discover new tools.
Related: Decorate your art space with this adorable Free Printable Watercolor Art.
This project is meant to be used for educational and experimental purposes so we are not looking to create masterpieces here. You may want to cover surfaces because it could get a bit messy while the kids have fun learning!
Supplies Needed for The Fun Watercolor Techniques Art Project

- Watercolor Paper – or Free Worksheet (download below) printed on Cardstock
- Watercolor Paints
- Water
- Salt – Kosher salt, or a larger granule salt works best
- Rubbing Alcohol
- White Crayon
- Plastic Wrap
- Straw
- Paintbrush – A larger size is preferred
- Cotton Swab
- Paper Towels
Download the Watercolor Techniques Printable Here
Using this printable saves kids time from drawing and writing the techniques themselves. By having the grid already printed, kids can jump right into the fun of exploring watercolor techniques.
Directions to Make This Fun Watercolor Techniques Art Project for Kids
Step 1

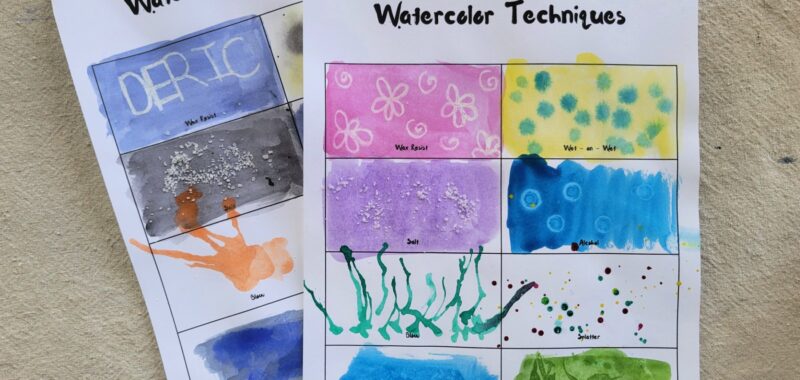
If not using the printable, have students create a grid on a piece of watercolor paper by using a pencil, Sharpie, or crayon. The grid needs to have 8 sections labeled: Wax Resist, Wet-on-Wet, Salt, Alcohol, Blow, Splatter, Tissue, and Saran Wrap.
If using the free printable, skip this step.
Step 2

In this step, kids use a white crayon to draw a “hidden” design or word in the first “Wax Resist” section. Kids should use firm pressure when drawing to ensure enough wax coats the paper. They are not coloring the entire section with a crayon.
Once the crayon image is drawn, use a dark watercolor paint to cover the entire segment. If done correctly, the crayon image should appear as the wax resists the watercolor.
Step 3

Important: Most of these steps require that kids work fast. The paint needs to be wet for the techniques to occur.
Moving to the next section, labeled “wet-on-wet”, use a light colored watercolor paint and quickly paint the entire section. Next, paint small dots on top of the wet paint with a darker watercolor paint. If done correctly, wet paint colors should bleed together.
Step 4

Move to the “salt” section next. Using a darker watercolor, paint the entire section. While the paint is still wet, sprinkle salt over the paint. The salt should absorb some of the wet watercolor paint. Leave the salt on the painting until it is completely dried, it can then be wiped away.
Step 5

Moving to the “alcohol” section, kids will use a dark watercolor to paint the entire section. While the paint is still wet, use a cotton swab, dipped in rubbing alcohol and simply dot across the paint. Unlike the salt, alcohol appears to repel the watercolor paint.
Step 6

In the “Blow” section, kids will drip paint onto the paper, leaving it in a big puddle. Using a straw, blow the paint around. Paint can be blown in various directions. This technique is useful when making trees, grass, and more!
Step 7

In the splatter step, we’re not worried about being confined to a box! We’re here to learn and have fun. Simply dip a brush in paint and tap it across your finger to splatter the paint onto the paper. Kids can also flick the bristles using their finger, or use a paint-filled toothbrush for a bit of a messier approach (though it does give a finer splatter effect).
Step 8

With a paper towel wadded up, and handy. Move to the “tissue” box. Here, kids will quickly paint the box with a dark color and lightly press the paper towel to areas of the wet paint. Do not blot away all of the paint. It may be helpful to have kids imagine they are blotting a few clouds into the sky of paint.
Step 9

Our final box! With a lightly crumpled piece of plastic wrap nearby, quickly paint the “saran wrap” box. While the paint is still wet, press the plastic wrap into it – be sure to keep the wrinkles! Leave the plastic wrap on the paper until it fully dries.
Set the page aside to dry.
Finished Watercolor Techniques Art Project for Kids

Since the Fun Watercolor Techniques Art Project is completed on paper, it can easily be displayed in a frame, on a clip, stuck to the refrigerator, or however you prefer.
Our Experience Making This Fun Watercolor Techniques Art Project
I repeat this project every year because my students love it so much! It’s a fun way to feel a bit like a scientist in the art room. When teaching this in a classroom setting, I find it easiest to have all supplies handy for each kid before we begin the project. Once we’ve completed the printable, I encourage kids to take a separate sheet of paper to create a painting of their choice. The only rule is that each kid must use at least of the 3 techniques they just practiced. This immediately gives them an opportunity to explore their favorite techniques and how they can be used together in art.
Prep Time
5 minutes
Active Time
20 minutes
Total Time
25 minutes
Difficulty
Medium
Materials
- Watercolor Paper – or Free Worksheet (download below) printed on Cardstock
- Watercolor Paints
- Water
- Salt – Kosher salt, or a larger granule salt works best
- Rubbing Alcohol
- White Crayon
- Plastic Wrap
- Drinking Straw
Tools
- Paintbrush – A larger size is preferred
- Cotton Swab
- Paper Towels
Instructions
- Skip this step if using the printable. If not using the printable, have students create a grid on a piece of watercolor paper by using a pencil, Sharpie, or crayon. The grid needs to have 8 sections labeled: Wax Resist, Wet-on-Wet, Salt, Alcohol, Blow, Splatter, Tissue, and Saran Wrap.
- Wax section – With firm pressure, draw or write with a white crayon. Paint over the drawing, using a dark color.
- Wet-on-wet section – use a light colored watercolor paint and quickly paint the entire section. Next, make small dots on top of the wet paint with a darker watercolor paint.
- Salt section – quickly paint box with a dark color and sprinkle salt onto the wet paint. leave salt on the paper until paint is dry.
- Alcohol section – quickly paint the box using a dark color. Use a cotton swab dipped in rubbing alcohol and make dots in the wet paint.
- Blow section – drip puddles of paint onto the paper and then blow them around using a drinking straw.
- Splatter section – load paintbrush with paint and then tap it across your finger to splatter paint onto the paper.
- Tissue section – quickly paint the section with a dark color and lightly lift spots of paint with a wadded up paper towel.
- Saran Wrap section – quickly paint the box with a dark color. While the paint is still wet, lay a wrinkled piece of plastic wrap over the paint. Leave plastic wrap on paint until dry. Set paper aside to dry.
Other fun watercolor activities from Kids Activities Blog
Did your kids have a blast trying these new techniques? Which techniques were their favorite?